This chapter contains the following topics:
This chapter describes how to do the following:
| • | Enter and print an Edit list of work orders |
| • | Print work orders |
| • | Commit the inventory needed to process the work orders |
| • | Issue work orders |
| • | Print additional copies of work orders that have been issued |
If you chose not use Kits in Control information, you may skip this chapter.
A work order is a request to assemble a specified quantity of a kit from its component items. Work order is abbreviated as W/O on various screens and reports in Inventory Control. The Kits chapter describes kits and the relationship between a kit and its components.
A work order can be immediate, in which case the kit is immediately placed in inventory. Alternatively, a work order may be printed, issued, and the component items removed from inventory, but the kit is not placed in inventory until the work order is completed.
When a work order is defined as immediate completion, Inventory transactions are created to remove the components from, and to add the kit to, inventory. The kit is immediately available for sale. No document is printed, and the process of closing the work order does not arise. For an immediate work order, you still have to commit the inventory and issue the work order.
When a work order is not immediate (typically because some time and labor is required to physically assemble the kit), several further steps are necessary before the kit is available for sale. These steps, described in detail in succeeding chapters, are summarized below.
| • | The work order must be committed (so that the inventory needed to complete it is not diverted to other uses). Several iterations of this step may be needed when shortages exist and partial commitment is authorized. Committed work orders may be deleted (in which case their components are uncommitted), but they may no longer be changed. |
| • | Work orders may be printed, but only after commitment. This is for the use of personnel doing the physical assembly. You may decide as you enter each work order whether or not you want to print it. |
| • | Work orders must be issued. This allows physical assembly of the kit to begin. Issuance requires that all needed components have been committed and that the work order has been printed (if so specified); it also removes the components from inventory, prevents printing the work order as a work order, and allows printing it as an issued work order. Issued work orders may no longer be accessed through the Enter selection, and therefore may no longer be deleted. |
| • | The work order must be completed (flagged as ready for closing). This happens upon physical assembly of the kit. It prevents printing an issued work order and allows printing a completed work order. Completion may be reversed at any time until the work order is closed; if this happens the completed work order reverts to being an issued work order. |
| • | Completed work orders must be closed. Closing the work orders adds the new kits to inventory. Closed work orders may no longer be printed as completed work orders. |
| • | At various stages in this progression, you may reprint work orders (even though printing was not originally specified), view work orders, or print lists of work orders not yet issued, of issued work orders, of issued orders overdue for completion, or of completed work orders. |
Work orders are entered and completed individually. The other functions (committing, printing, issuance, and closing) operate upon the work orders as a group (optionally restricted by range or other properties) much as posting does in other selections.
Select
Enter from the Work orders menu.
The following screen displays:
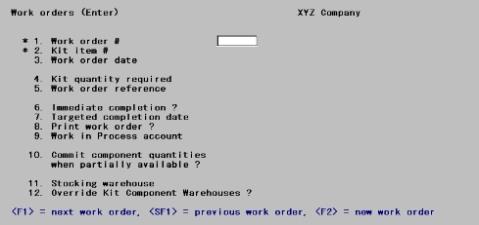
Enter the following information:
1. Work order #
If you want a new work order, use the <F2> key to generates a new work order number by adding one to the previous number used. The initial value is set in Control information.
Enter an existing work order number.
Options
You may also use one of the options:
|
<F1> |
For the next work order |
|
<SF1> |
For the previous work order |
|
<F2> |
For a new work order number |
Entering a number that is already on entered, or using the <F1> or <SF1> keys, loads the screen with the data for that existing work order and positions the cursor at the Field number to change ? prompt. You may then change or delete the work order.
|
Format |
Up to six digits |
|
Example |
Press <F2> for a new Work order. |
2. Kit item #
Kit items must be defined via the Items selection, and must already have been defined as a kit, via the Kits selection. Enter a kit item number.
Options
You may also use one of the options:
|
<F1> |
For the next kit item number |
|
<SF1> |
For the previous kit item number |
|
Format |
Up to 15 digits |
|
Example |
Press <F1>. |
3. Work order date
Enter the date to be assigned to this work order press <Enter> for the default date. For the first W/O entered, the default is the System date; thereafter, the date of each work order entered becomes the default for the next
|
Format |
MMDDYY |
|
Example |
Press <Enter> for system date |
4. Kit quantity required
Kit quantity required is almost always an integer, but fractional quantities are permitted if the kit is not serialized. This is occasionally useful when dealing with kits assembled from components that can be measured but not counted. For example, 105-octane gasoline might be defined as a kit assembled from an 80-octane component and a 120-octane component in a certain proportion. You might then have as a result 250.35 gallons of the 105-octane gasoline and would enter that as the kit quantity.
Enter the number of kits to be assembled for this work order.
|
Format |
99999999.99999 |
|
Example |
Type:8 |
5. Work order reference
Enter a reference for this work order. This field is optional and is provided so that you may enter a customer number, purchase order number, or whatever reference you choose.
Later, you will be able to locate an incomplete work order using this reference. This is useful if you need to determine if a work order for a specific customer has been completed or not. Using View work order history, you will also be able to locate a completed work order using this reference.
|
Format |
Enter up to 15 characters |
|
Example |
Type:PO-135-923 |
6. Immediate completion ?
An immediate completion work order renders the kit-item available for sale now. Typically you would use this feature for kits needing little labor or time for assembly.
If you answer N the work order is processed as a normal work order. You must commit, issue, complete, and close it before you can sell the kit or before inventory is adjusted.
If you answer Y, then:
| • | The work order is never printed. |
| • | It is automatically completed and closed as soon as it is entered. |
| • | There is no targeted completion date. |
| • | No work in process account is required (since the components are placed into and removed from work in process immediately). |
| • | The next three fields on the screen are skipped. |
| • | Component usage transactions and kit assembly transactions for Inventory are generated through the Issue work orders process. |
Unlike regular work orders, immediate work orders can not be committed if there is a shortage of needed components. Attempting to do this generates the message Inventory short.
| • | You may continue to enter the work order as a regular work order. |
| • | If you have already physically assembled the work order on an emergency basis by using inventory already committed to other uses, you cannot enter the immediate work order until you have either: |
Received further inventory, or Identified and deleted the work order(s) whose components you have pre-empted.
|
Format |
One letter, either Y or N. There is no default. |
|
Example |
Type:N and then press <Enter> |
7. Targeted completion date
This field does not apply to immediate completion work orders.
Enter the target date on which this work order is to be completed. This date will appear on screens and reports used to track incomplete work orders.
|
Format |
MMDDYY |
|
Example |
Type:92505 |
8. Print work order?
This field does not apply to immediate completion work orders.
If the nature of your business is such that you do not require a printed document, answer N. The work order will still have to be issued even though not printed. If you change your mind later you may obtain a copy via the Print issued work orders selection, if the work order has already been issued; or via the Print work orders selection, if it hasn't. Once the work order is completed it may no longer be printed.
|
Format |
One letter either Y or N there is no default |
|
Example |
Type: Y |
9. Work in Process account
This field does not apply to immediate completion W/O’s.
When the component usage transactions for the work order are posted, the work in process account entered here is debited for the cost of each component item. These items are retained in the work in process inventory until the corresponding kit assembly transaction is posted after closing the work order (using Close work orders).
Enter an existing work in process account or press <F2> for work in process account.
|
Example |
Press <F2>. |
10. Commit component quantities when partially available?
Prior to printing this work order, you must commit the inventory quantities for the component items using Commit inventory. When Commit inventory is run, the quantity available for one or more of the component items that you designated as Full amount items in the kit definition (using Kits) may be less than the amount required to assemble the quantity of kits needed.
If you answer Y, then component-item quantities will be committed for all items, even if there is a shortage for the Full amount component items. In this case, the Work Order Status Report will show the amounts committed and the amounts still needed in order to print and issue the work order. Use this report (described in the Committing Work Orders chapter) to determine what receivings are needed to obtain sufficient quantities available to issue the work order. Once these receivings have been entered using Inventory, you may run Commit inventory again to commit the remainder needed to assemble the kit. Then, the work order may be printed and issued.
If you answer N, a shortage of any Full amount item will prevent commitment of all components on the work order. The Work Order Status Report will show the shortages for each component item.
Work orders compete with one another for scarce parts. If you want to ensure that kits are assembled first-come first-served, always respond Y. Understand that this could result in some work orders being delayed even though parts are on hand, because the parts they need are committed to other work orders waiting for other parts.
If you want to maximize turnover and ensure that each part is used as soon as there is a kit ready to use it, always respond N. The danger here is that work orders containing numerous parts could be kept waiting indefinitely because there is never enough at any one time of every part needed. This policy, therefore, requires more careful monitoring than the other.
|
Format |
One letter either Y or N there is no default |
|
Example |
Type:Y |
The next two fields appear only if you use multi-warehousing.
11. Stocking warehouse
This is the warehouse where the assembled kit is to be stocked. The kit item must already be defined (in Items) as stocked at that warehouse.
Enter a warehouse code.
Options
You may also use one of the options:
|
<F1> |
For the next warehouse for this item kit |
|
<SF1> |
For the previous warehouse for this item kit |
|
Format |
Up to two characters or use the option |
|
Example |
Press <F1>. |
The description of the warehouse appears next to its code as soon as one has been selected.
12. Override Kit component Warehouses ?
Answer Y if you wish to override.
Make any desired changes.
Options
You may also use one of the options and press <Enter>.
|
<F1> |
For the next work order |
|
<SF1> |
For the previous work order |
|
<F2> |
To enter a new work order number |
|
<F3> |
To delete this work order |
|
<F6> |
To enter or view Work Order comments |
When a work order is deleted after inventory has been committed to that kit, any serialized components are released. They become available for sale or for incorporation into another kit.
To enter or view existing comments about this work order, press <F6>.
Press <F6> to enter up to 10 lines of 64 characters each.
Options
When you press <Esc> from the comments window, you have these options:
|
File |
Save what was just entered/changed, and clear the screen for entry of another comment. (Like pressing <Enter> at Field number to change ? in other selections.) |
|
Save & |
Save what has been entered or changed, but leave the information on the screen for further work. |
This selection enables you to edit and display all or a range of work orders.
Select
Edit list from the Work orders menu or Work order edit list from the Reports, kits menu.
The following screen displays:
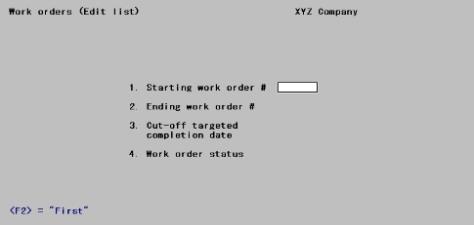
Enter the following information:
1. Starting work order # and
2. Ending work order #
Enter the range of work orders to appear on the edit list or press <F2> for First and Last at each field.
|
Format |
Up to six digits for each field, or use the option |
|
Example |
Press <F2> at each field |
3. Cut-off targeted completion date
Enter the last targeted completion date for which work orders are to be included on the edit list or use the options below. Work orders with a targeted completion date later than this date will not be included.
Press <F2> for Latest (no cutoff date)
|
Format |
MMDDYY or use the option |
|
Example |
Press <F2> for Latest |
4. Work order status
The status of a work order changes as it proceeds through the various steps of processing. These are listed in the table below.
Enter one of the statuses listed.
Options
You may also use the options:
|
N |
For Not committed |
|
S |
For Inventory short |
|
P |
For OK to print |
|
I |
For OK to issue |
|
<F5> |
To include All work orders regardless of status |
Note that Issued is not listed as a status. A separate selection is available to print issued work orders. Refer to the Print Issued Work Orders chapter.
|
Format |
One letter from the options above |
|
Example |
Press <F5> then press <Enter>. |
|
Work Order Status |
Description |
|
N |
Assigned by Work orders when the work order is first entered. |
|
S |
Assigned by Commit inventory when there is a shortage of a Full amount item and commitment of partially available inventory is disallowed. |
|
P |
Assigned by Commit inventory when there is sufficient quantity available for all Full amount items and the work order is to be printed before being issued. |
|
I OK to issue |
Assigned by Print work orders after printing a work order. Also assigned by Commit inventory when there is sufficient quantity available for all Full amount items and the work order does not need to be printed before being issued. |
Prior to printing a work order, you must commit the inventory quantities for the component items using Commit inventory.
When Commit inventory is run, there may be insufficient quantities available for one or more component items that you designated Full amount in the Kits selection.
If you answered Y to Commit inventory when partially available? on the work order, then component-item quantities will be committed for all items. In this case, the Work Order Status Report will show the amounts committed and the amounts still needed in order to print and issue the work order. Use this report to determine what receivings must be done in order to have sufficient quantities available to issue the work order.
For shortages on Full amount component items, once receivings have been entered using Inventory, you may run Commit inventory again to commit the remainder needed to assemble the kit. Then, the work order may be printed and issued.
If you answered N to Commit inventory when partially available?, then no component items are committed if there is a shortage of any Full amount items. The Work Order Status Report will show the shortages for each component item.
The Work Order Status Report is printed as part of running Commit inventory. It shows the status (as described earlier) of each work order processed. For work orders with insufficient quantities available for Full amount components, or with insufficient quantities for Shortage OK components, actual shortages are shown on the report. Shortages of Shortage OK components do not prevent a work order from being printed and issued. They are listed on the Work Order Status Report for your information.
Select
Commit inventory from the Work orders menu.
The following screen displays:
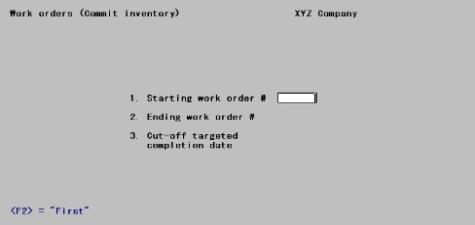
Enter the information as follows:
1. Starting work order # and
2. Ending work order #
Enter the range of work order numbers for which to commit inventory or press <F2> for First and Last at each field
|
Format |
Up to six digits for each field, or use the option |
|
Example |
Press <F2> at each field. |
3. Cut-off targeted completion date
Enter the last targeted completion date for which to commit inventory for work orders. Those with a targeted completion date that is later than this date will not be processed by Commit inventory. Press <F2> for Latest (no cutoff date).
|
Format |
MMDDYY or use the option |
|
Example |
Press <F2> for Latest. |
This selection enables you to print all or a range of work orders. If you specify that a work order must be printed prior to being issued, then print it using this selection.
Immediate completion work orders cannot be printed
If you specify that a work order must be printed prior to being issued, then print it using this selection.
Select
Print work orders from the Work orders menu.
The following screen displays:
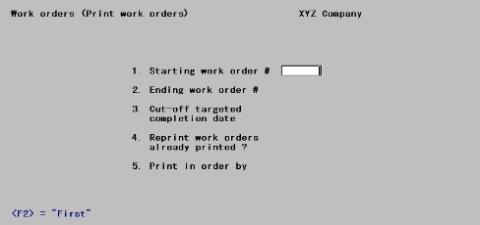
Enter the information as follows:
1. Starting work order #
2. Ending work order #
Enter the range of work orders to print or press <F2> for First and Last at each field.
|
Format |
Up to six digits for each field, or use the option |
|
Example |
Press <F2> at each field for "First" and "Last". |
3. Cut-off targeted completion date
Enter the last targeted completion date for which to print work orders. Work orders with a targeted completion date later than this date will not be printed. You may also press <F2> for Latest (no cutoff date).
|
Format |
MMDDYY or use the option. |
|
Example |
Press <F2> for the Latest. |
4. Reprint work orders already printed?
Answer Y to reprint work orders that have already been printed.
If you are using multi-warehousing, an additional field appears:
|
Format |
One letter either Y or N, the default is N. |
|
Example |
Press <Enter> to accept the default. |
5. Print in order by
Select S by stocking warehouse, or W by work order number.
If you select S to print in order by stocking warehouse, field #6 appears as follows:
|
S |
Stocking warehouse |
|
W |
Work order number |
|
Format |
One letter from the table above there is no default. |
|
Example |
Type: S and then press <Enter>. |
6. Stocking warehouse
Enter a warehouse. Work orders are printed if their kit items are to be stocked at this warehouse.
Options
You may also use one of the options:
|
<Enter> |
For the Central warehouse |
|
<F1> |
To print work orders for All stocking warehouses (work orders will be printed in order by the warehouse in which the kit items are stocked) |
|
Format |
Two characters or use the option |
|
Example |
Press <Enter> for Central. |
A work order may be issued if it has the status OK to issue. This status is assigned when the following has occurred:
| • | All Full amount component items have been committed for the work order, using Commit inventory. |
| • | The work order has been printed. (This step is not required if you answered N to Print work order ? when the work order was entered.) |
When a work order is issued, component usage transactions are generated in Inventory Transactions for each component-item of the work order. Additionally, the Qty on W/O for each kit-item is increased.
For an immediate completion work order, a kit assembly transaction is generated in addition to the component usage transactions. However, the Qty on W/O is not increased for the kit-item because the work order is considered to be completed immediately. However, the generation of the kit assembly transaction increases the quantity of the kit-item available for sale by decreasing quantity committed for the kit-item.
Select
Issue work orders from the Work orders menu.
The following screen displays:
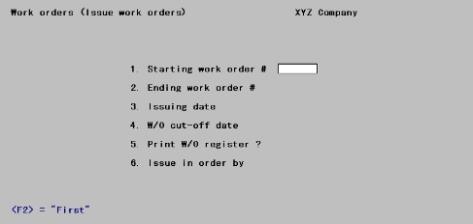
Enter the following information:
1. Starting work order # and
2. Ending work order #
Enter the range of work orders to issue or press <F2> for First and Last at each field.
|
Format |
Up to six digits for each field, or use the option |
|
Example |
Press <F2> at each field. |
3. Issuing date
Enter the issue date to be assigned to these work orders. This date is used as the date for the component usage and kit assembly transactions that are placed in Inventory Transactions. You may also press <Enter> to use the System date.
|
Format |
MMDDYY or use the option |
|
Example |
Press <Enter> for the System date. |
4. W/O cut-off date
Enter a cut-off date for the work orders to be issued. Work orders with a Work order date that is later than this date will not be issued. You may also press <Enter> to use the date entered for Issuing date.
|
Format |
MMDDYY or use the option |
|
Example |
Press <Enter> for the Issuing date. |
5. Print W/O register?
Answer Y to print a Work Order Register.
If you chose to print a Work Order Register, then select to print the register in either F (full) or B (brief) format.
|
Format |
One letter either Y or N, there is no default |
|
Example |
Type Y then press <Enter>. |
If you are using multi-warehousing, an additional field appears:
If you chose to print a Work Order Register, a new section of this field will appears, then select to print the register in either F (Full) or B (Brief) format.
Options
You can use one of the following options :
|
F |
For Full format of W/O Register |
|
B |
For Brief format of W/O Register |
|
Format |
One letter either F or B. There is no default. |
|
Example |
Type: F and then press <Enter>. |
6. Issue in order by
Enter S to issue work orders by stocking warehouse, or W by Work order number.
Options
You may also use one of the options:
|
S |
For Stocking warehouse |
|
W |
For Work order number |
If you enter S for Issue in order by, field #7 appears as follows:
7. Stocking warehouse
Enter the stocking warehouse for which to issue work orders.
Options
You may use one of the options:
|
<Enter> |
For the Central warehouse |
|
<F5> |
For All warehouses |
|
Format |
Enter up to two characters or use the option |
|
Example |
Press <F5> for All warehouses. |
Make any desired changes, or use one of the options, and then press <Enter>.
Use the Print issued work orders selection to print additional copies of non-immediate work orders that have been issued.
You may also use this selection to print don't print work orders (i.e., work order was originally specified to not print).
Work orders may not be printed using this selection after they are closed using Close work orders, or if they were specified as immediate completion when the work orders were entered.
Select
Print Issued work orders from the Work orders menu.
The following screen displays:
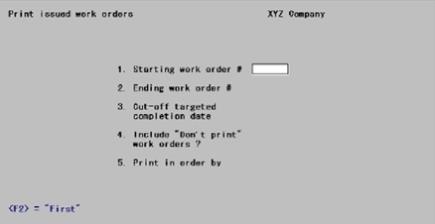
Enter the information as follows:
1. Starting work order # and
2. Ending work order #
Enter the range of work orders to print or press <F2> for First and Last at each field
|
Format |
Up to six digits for each field, or use the option. |
|
Example |
Press <F2> at each field. |
3. Cut-off targeted completion date
Enter the last targeted completion date for which to print work orders. Work orders with a targeted completion date later than this date will not be printed. You may also use press <F2> for Latest (no cut-off date)
|
Format |
MMDDYY , or use the option. |
|
Example |
Press <F2> for (no cut-off date) Latest. |
4. Include "Don't print" work orders ?
Do not print work orders are those for which you answered N to field # 8 (Print work order ?) in Work orders (Enter).
If you answer Y, all work orders will be printed. If you answer N, Do not print work orders will not be printed.
Immediate completion work orders are never printed.
|
Format |
One letter, either Y or N, there is no default. |
|
Example |
Type:Y and then press <Enter>. |
5. Print in order by
Enter S by stocking warehouse, or W by work order number.
Options
Use one of the following options :
|
S |
For Stocking warehouse |
|
W |
For Work order number |
|
Format |
One letter, either S or W. There is no default. |
|
Example |
Type S and then press <Enter>. |
If you enter S for Print in order by, field # 6 appears as follows:
6. Stocking warehouse
Enter a warehouse. Work orders will be printed if their kit-items are to be stocked at this warehouse.
Enter the stocking warehouse for which to issue work orders.
Options
You may also use on of the options:
|
<Enter> |
For Central warehouse |
|
For All warehouses |
|
Format |
Enter up to two characters or use the option. |
|
Example |
Press <F5> for All warehouses. |
Make any desired changes, or use one of the options, and then press <Enter>.
Use the Quick work orders selection to process a single step work order.
Select
Quick work orders from the Work orders menu.
The following screen displays:
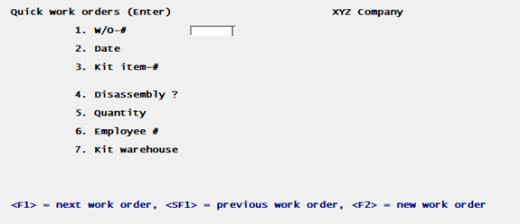
Enter the information as follows:
1. W/O- #
Enter the number of the quick work orders to process.
Options
You may also use on of the following options:
|
<F1> |
For the next work order |
|
<SF1> |
For the previous work order |
|
<F2> |
To create a new work order |
|
Format |
Up to six digits |
|
Example |
Press <F2>. |
2. Date
Enter the date for this quick work order or press <Enter> for the System date.
|
Format |
MMDDYY ,or use the option. |
|
Example |
Press <Enter> for the System date. |
3. Kit Item -#
-#
Enter in the kit item number you are building.
Options
You may also use one of the options:
|
<F1> |
For next Kit item number |
|
<SF1> |
For previous Kit item number |
|
Format |
Enter up to 15 characters, or use the option. |
|
Example |
Press <F1> and then press <Enter>. |
4. Disassembly ?
Enter Y to disassemble and N to not disassemble.
|
N |
Increases the quantity amount of a kit inventory item and reduces component item quantities |
|
Y |
Reduces the quantity of a kit inventory item and increases quantities of component items |
5. Quantity
Enter the quantity of kits you will be building. If disassembly enter the quantity of kits you are removing.
|
Format |
Up to nine digits |
|
Example |
Type:234 |
6. Employee #
Enter your employee # or any numbers. You cannot leave it blank.
This field does not print on any reports or view screens. It is only available through SQL tables or XDBC. It is stored in Quick Work Orders (QIKWRK) and Work Order History (WKOHDR). It is the employee number (emp_no) column in both cases. See the Field Definition Guide for details on the tables and columns.
|
Format |
Enter up to six digits |
|
Example |
Type 1 |
7. Kit warehouse
This field can only be entered if you are using multiple warehouses.
Enter a warehouse or press <Enter> for the Central warehouse
|
Format |
Up to two characters, or use the option. |
|
Example |
Press <Enter> for Central warehouse. |
Make any changes or press <Enter> at Field number to change ?. The following screen displays:
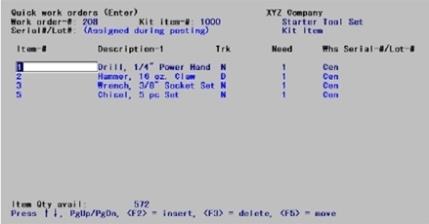
This screen allows you to modify the components items, quantity and warehouse if they differ from the original entry under Kits.
You may use the following options:
|
<PgUp> |
Page Up |
|
<PgDn> |
Page Down |
|
<F2> |
To insert |
|
<F3> |
To delete |
|
<F5> |
To move |
When inserting or entering a new component, you must enter the following fields:
Item-#
Enter the component item number.
The item must already have been defined as an item in the Items selection.
|
Format |
Up to 15 characters or use the option |
|
Example |
Press <F1> |
|
Note |
Miscellaneous items (those beginning with an asterisk) may be included as components in kit-items. You may use them to assign labor charges and overhead costs to a kit-item. |
Need
Enter the number of component-items required to assemble one kit item. Press <Enter> to default to a quantity of 1.
|
Format |
99999999.99999 |
|
Example |
Type: 1 and press <Enter> |
Whs
This field may not be entered if you are not using multiple warehouses.
Enter a warehouse code, or use the option:
|
<Enter> |
To designate this warehouse as the “Central” warehouse |
|
<F8> |
To select the warehouse via a lookup |
Serial-#/Lot-#
If you have serialized or Lot controlled items, you must enter serial and lot numbers for this item.
Press <Esc> when you have made your changes and entries and the following options display:
Options
The options that become available are:
|
1 |
Save and post |
To save and post the work order |
|
2 |
Save |
To save the changes to the work order. You may return later and continue editing the work order or post it then |
|
3 |
Abort |
To not save the quick work order |